Brake Pad Replacement
The Value of a hands-on experience at Dave Leligdon’s Spring Tech Session
By Dave Anderson
They say “Fear” and “Money” are powerful motivators. In my case, my fear of getting in above my head when doing maintenance jobs on the BMW have overcome my fear of the bill from the dealer at the end of the work. This is where the Gateway Tech sessions can be the great equalizer. At the last session, I learned that Chris Kerckhoff had a need to replace brake pads on his RT. I seized the opportunity and asked to work with him at the tech session to participate in the job and get some of the “hands-on” muscle memory that inspires confidence. Having never seen a brake replacement before, I had no idea what to expect.
When I arrived, Chris was looking confident (i.e. he had done his homework on You Tube) and was also dressed like he was going to an Alumni Dinner. Hence, I took the opportunity to grab the first tool and let Chris be the brains of the operation so I could get the muscle memory of performing the tasks. It worked out great for both of us. He left without a spot of grease on his oxford shirt and I got the experience I was hoping for. The following are highlights and take-aways from that process.
 Front Wheel: Front is easiest.
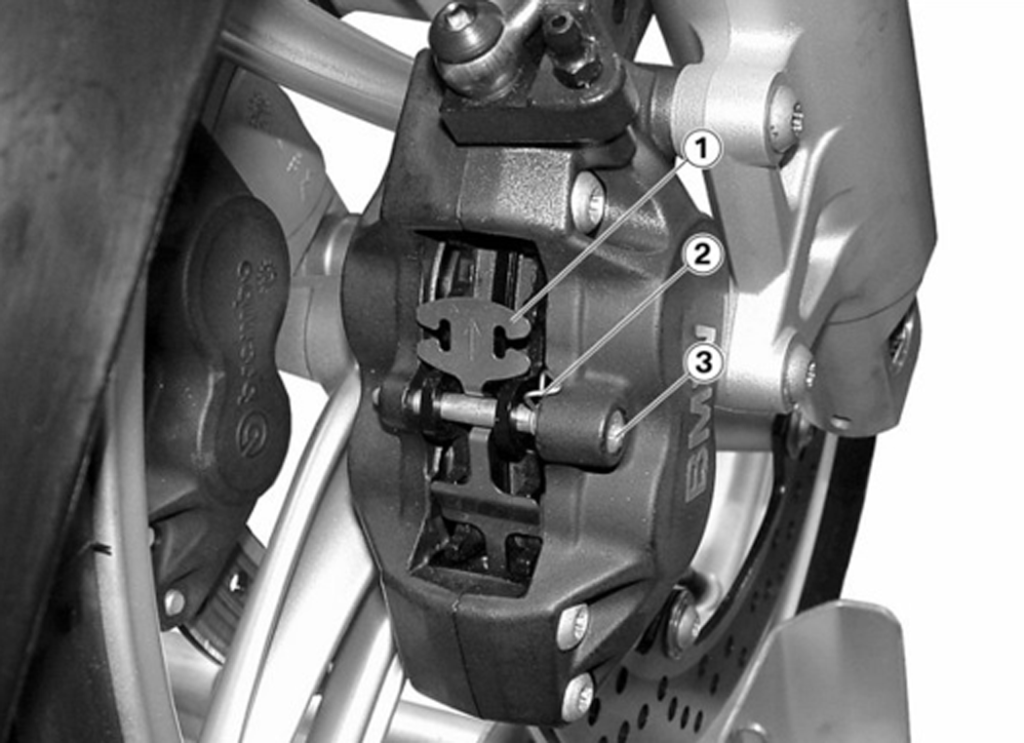
1. Remove cotter pin (2) on top of caliper assembly. Unscrew bolt (3) and remove it above the “M” in the BMW logo stamped on the side of the brake calipers.
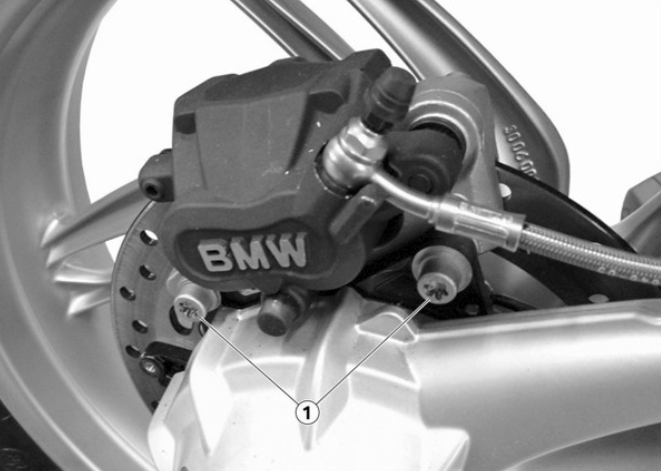
2. Then loosen the two Torx bolts (4) that hold the brake calipers in place. Spread the calipers apart using your fingers or some non-marring tool. At this point a clip spring on top (1) releases and you will want to remove it. Notice it is aligned in the direction of wheel rotation.
3. Use needle nose pliers to grab the top of each pad on either side of the rotor and wiggle each to remove the pads that are now loose.
4. Open up that new package of pads and drop each into place to match the pad orientation for the ones you removed. (Hint: this is where having a cell phone camera can help by taking pictures as you go showing orientation and placement of parts prior to removal to serve as a reference during the reassembly process.)
5. After placing the new brake pads in place and reinstalling the top clip spring, reinsert the bolt (the one removed above the “M”) and torque it to specs. Reinstall the cotter clip into the groove on that bolt and that completes the work on your knees.
6. To prevent a scary moment from occurring it is best to pump the front brake several times until you feel the brakes engage the rotors to ensure hydraulic fluid pressure is available at the brake.
7. Now it’s time to move to the rear wheel.
 Rear Wheel:
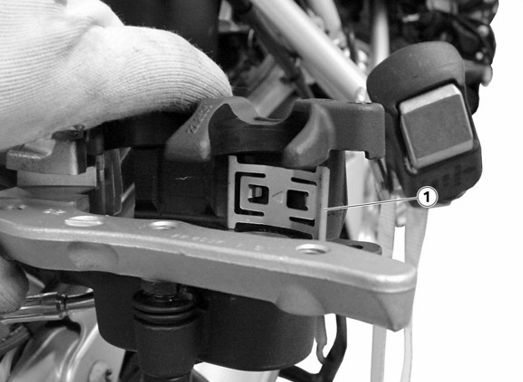
1. The first step was to loosen the two Torx bolts (1) that held the rear brake assembly to the bike (but not remove them).
2. Next, we removed the locking cotter pin (1) using needle nose pliers and used a punch to knock the long pin out towards the wheel (2). Notice that this center pin has striations that serve as wear bars which provides quick visual reference on the extent of wear on your pads.
3. Then we removed the two Torx bolts that we had loosened earlier. We wiggled the caliper pressing against the rotor to spread the pads so we could then lift the caliper assembly off the disk.
 4. With the assembly off the rotor (this step helps to have a second set of hands to hold the caliper assembly while the other person can remove the pads which should just about fall out.) We took this opportunity to clean the rotor with brake cleaner with the calipers off.
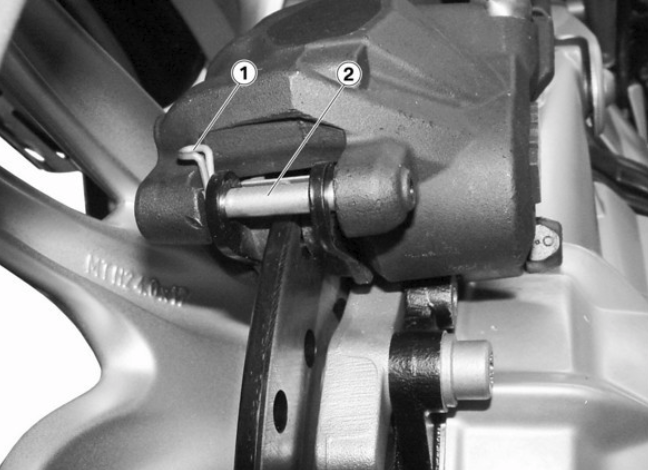 5. In our case the top flat spring clip (1) also fell out unexpectedly and it took a little bit of time to figure out how it was originally seated. Hence, I recommend you note the orientation and seating (even a digital photo) to help you replace this clip if it drops out during this procedure. Notice the arrow faces the direction of travel.
6. Note the orientation of pads and we installed the top spring clip, set the new pads in place (ensuring the leading edges fit in the slot), and then set the assembly back over the rotor. We had to widen the assembly a bit using our fingers to ensure we didn’t gouge the new pads.
7. Next, we aligned the caliper assembly so we could tap the pin (with the striations) from the wheel side and then reinstalled the cotter pin. Finally, we installed and tightened the two caliper bolts to torque specs 24Nm if my memory serves me correctly.
8. We pumped the rear brake until we had proper actuation of the rear brake to complete the procedure.
As Art Belt mentioned, new brakes need some heat cycles to bed in and conform to the rotors. So be sure to not expect 100% breaking efficiency out of them for a few stops.
Replacement Brake Pads Used:
Chris Kerckhoff 2009 R1200RT Hex Head – One pair of EBC Brake Pads (#FA363) for rear and two pair of (FA335HH) for front.
Art Belt 2016 R1200RT WC – One pair of EBC brake pads (FA363 HH) for rear and two pair (FA335 HH) for front.
Sintered brakes: The HH is a higher performance sintered brake pad which is considered higher performance than the organic brake pads. Sintered brake pads have become the standard OEM on the majority of new motorcycles. They will cover the broadest spectrum of conditions that a rider will encounter.
Sintering is the fusing of metallic particles under heat and pressure to create a brake pad that is very resistant to friction. The EBC brakes use copper in their blend as an example. These pads perform well under extreme heat stress, like at the track, and will also last longer than other brake pad types.
Sintered brake drawbacks – they do increase wear and tear on the rotors. Therefore, you need to ensure your rotors are designed for sintered brakes prior to selecting this type of brake. They are also louder and more expensive than the “organic” brake pad counterparts.
Organic brakes. These pads are great for the casual rider and are made from a mix of fibers and fillers bound together with a resin. Riders report liking the feel of these brakes as they have a more progressive feel when the brakes are applied in comparison to the abrupt bite of the sintered pads. Another advantage is they produce very little wear on the rotors and also produce very little brake dust. Additionally, they are cheaper because the production process and materials are cheaper. The downside to the organic pads is that they will wear at a higher rate than the sintered pads and are not as tolerant to excessive heat. They can lose their friction ability once they reach their max operating temperature and will burn up fairly fast. These pads do not perform as well in wet or muddy conditions and are known to build up a glaze on the outside that can degrade braking.
Semi-Sintered brake pads – these are marketed as the best of both worlds and offered from EBC. They offer the long life of a sintered pad and the progressive feel and lack of rotor wear of organic brake pads.
Per the notes in the EBC catalog, you should not use the “sintered” brake pads designated by the HH on the rear if you don’t also use them on the front. This would cause a braking imbalance. After reviewing the catalog, it appears most of the bikes that we ride call for sintered brakes for the front wheel which is the main source of our stopping power. The rear pads are where you have a choice of either going organic such as the FA363, the semi-sintered FA363V, or the sintered FA363 HH. Chris chose organic on the rear and Art Belt chose the HH sintered for front and rear.
Art ordered his online and Chris purchased his through Gateway. My recollection is that there was a minor cost saving, mostly in taxes, for purchasing online. For your first time purchasing replacement brake pads, it might not be a bad idea to purchase locally from a shop that could advise you on the best pads to match the rotors on your bike and your riding style.
The following is a link to the 2017 EBC Catalog.
Many thanks to Chris for letting me do his dirty work and for Dave’s Motowerks for providing the opportunity, the lift, the tools and sage experience to enable a neophyte such as myself the opportunity to learn to do for myself. I am looking forward to my first brake replacement now that my “Fear of $$” spent at the shop rate is greater than my fear of doing the work myself. I hope this article helps you come to the same conclusion.